WHAT'S NEW?
Loading...
Data sharing have become integral part of our digital lives and when it comes to sharing large amount of data there are various options but they need time.So, best method to share data between two computer is to use lan cable which moves data between two computers fastly and with very less effort.As always Askrdx is at your rescue to fulfill your basic tech knowledge.Today we will be focusing on transferring data using lan cable but in subsquent tutorials i will be back with more methods of transferring data.


Let's start with our process.Basic prerequisites are:

  • Two computers with windows 7/8/10
  • RJ-5 Lan cable.

1. Firstly the main step in connection of computers is connect your machines using the LAN port available.
2. Now open Control panel on both machines.
3. Open Network and Internet.


    4. Move to Ethernet and click on it.


    5. Open properties of Ethernet connection.Now select "Internet           Connection Protocol Version 4(TCP/IPV4)"


    6.Open it's properties and change the I.P address and subnet mask       as follows on computer one and two:


    Computer 1 : I.P Address : 192.168.0.1
    Computer 2: I.P Address : 192.168.0.2

    //Common 

    Subnet Mask :255.255.255.0


    7.Now Restart both computers.

    8.Now open Control panel and create a Workgroup on any one machine.

    • Open control panel >Network and Internet>
    • In left sidebar you will see Homegroup option,just select it and follow instructions to create a workgroup.
    9.Select the things to share.


    10.Now create a password for Workgroup.


    11.Open My PC > My Network Places.


    12. You'll see Your computers connected .Now you can share Various files present in default Libraries ie. Music,Pictures.

    13. For sharing Drives,Folders just Open properties of that           Folder/Drive.


    14. Now Select Advanced Sharing and tick the option of Share this Folder/Drive.


    15. And then you should be able to share these folders/Drives flawlessly.


    \
    If you have any troubles/queries you can comment here we are always eager to help you.#Askrdx


    Lot of people root their phones but they have no idea what to do with the root access.So here i am to solve their problems with a fresh article about the various must have apps for your rooted phones
    Today i am gonna share you with the best apps available for your rooted phone.
    If you  have'nt rooted your phone you can watchout this post:
     Universal Methods for rooting phones
    For various benefits of rooting you can watchout this post of  mine :
    Benefits of rooting

    Now lets get to the must have apps for a rooted phones.Basically there are lots of apps available which help you in increasing your battery life,customise your phone,flashing roms,changing cpu frequencies,modifying system files and i must say a lot of apps are present.But I'll present you with the apps which are most useful and you will not regret installing these apps. :)


    best-apps-for-rooted-phones

    #1 ES Filemanager
       I must say that the first app to install after rooting your phone is ES filemanager as this one such app which will do work of 7-8 apps ,from a filemanager to a video,audio player,root browser,app installer,sd card analyst.This app also work in non-rooted mode.


    #2 Xposed Framework
    Xposed is a framework for modules that can change the behavior of the system and apps without touching any APKs. That's great because it means that modules can work for different versions and even ROMs without any changes (as long as the original code was not changed too much). It's also easy to undo. As all changes are done in the memory, you just need to deactivate the module and reboot to get your original system back. There are many other advantages, but here is just one more: Multiple modules can do changes to the same part of the system or app. With modified APKs, you to decide for one. No way to combine them, unless the author builds multiple APKs with different combinations.This app work as a framework for other apps to modify system files.

    #3 Flashify

    Flashing manually can be a lot of work. What if there was an app that did all the heavy lifting? With Flashify, you can sit back and let the app automatically flash for you. This is an app for those who like to have a lot of customization and don't want to spend endless hours getting get. 
    With Flashify, you can flash your boot.img, recovery.img and zip files with ease. If you want to backup these to your local or cloud storage, the app automatically syncs them. You get automatic cloud synchronization between backups of devices and your desktop. The app allows you to restore kernel and recovery using an SDcard as well. 
    The app is free to use but you should be aware that you can only perform three free flashes per day. If you have a lot of flashes to do, you might want to consider purchasing a few more. If you want to spread them out so you don't have to pay, you can add them to your queue and they can be flashed the next day. 

    #4 Link2SD – Increase internal memory of your mobile

    This is one of best rooted app for android mobile which you can use to increase internal memory of your android mobile which is rooted and SU permissions enabled. This app is a bit complex as to increase internal memory of your android mobile you have to create partition in your memory card, but this app is worth try and a must have root app for rooted android mobile phones.

     #5 Greenify

    This app is one of the best apps for rooted phones as it increases the battery life of your device and is of the best apps for installing.


    #6 Titanium Backup

    Titaniun Backup is one of best root app which can be used to do multiple things.Its also one of must have android app, if you experiments with your phone most of the time, than you cant afford to miss this app, as this app will simply create backup of your APK as well of its data also.

    Some of great features of Titaniun Backup: 

    Can backup and restore app data along with apk. 

    Can change android ID easily.

    Can remove system app which can be installed from Application manager

    #7 System App Remover

    Best app to  remove the unwanted bloatware present in your system to free up space for other apps.This app further help in boosting your droid perfomance

    #8 Quick Boot (Reboot)
    Quick Boot is an app that is both absurdly simple and absurdly useful. In most versions of Android, the power menu is weak sauce and you can only power down and sometimes you can reboot. Quick Reboot fixes this by allowing you to boot to recovery, and boot to bootloader. If you go pro, you’ll also get Tasker support as well as a hot boot option which just reboots the Android UI. It’s quick, simple, and makes finding an advanced power menu for your device a little bit less of a priority.

    #9  ROM Toolbox

    This is one of the very few all-in-one solutions for root users that still actually works. It has a bunch of features that includes a built-in file browser with root, app manager (uninstall system apps, etc), ROM management (create nandroid backups), script writer, font installer, and a lot more. On some devices, you can even change the boot animations, themes, and status bar icons. It doesn’t work for every phone, but it should work for most. Do beware, though, because it’s been half a year since the app was updated and we’re not entirely sure if the project was abandoned or not.


    #10 Viper4AndroidFX
    If you're serious about the audio output of your rooted Android phone then Viper4Adnroid FX is the root app you want. It has too many features to list here, but you can go nuts with EQ mode settings, get near-lossless sound quality, optimize your speaker output, get Hi-Fi sound on your headphones and manage system audio settings to work on any third-party or system app.Best app for music lovers to enhance their music effects.

    #11 DiskDigger-Best app to recover data on the go
    We're huge fans of recovering lost SMS, photos, files and data, and once you're rooted there are even more solutions to the problem. If you've accidentally deleted photos, files or something else off your phone, DiskDigger can instantly recover it without losing a second (which is important in these situations).

    #12 BetterBatteryStats
    Who doesn't love a good battery stat? OK, maybe not most people, but I'll assume that if you're the type of Android owner who wants to root your phone, you might have an above-average interest in critical system things like battery consumption.
    Better Battery Stats offers just that: a much more detailed and informative breakdown of what's using your battery. A lot of this comes stock in Android Marshmallow but if you don't have that update yet, this is the next best thing.

    #13 Tasker - Automation tool

    It's big, it's complex and a little daunting, but if you can commit yourself to it fully, you'll be repaid in full. Tasker is a full system automation app that can automate anything you do regularly with your Android phone, from setting up scheduled activities to automating tasks in apps. 

    #14 Device Control
    If you're rooted you now have the ability to over-clock or under-volt your Android. These terms basically mean pumping more power into your CPU or limiting the amount of juice your battery uses. Device Control gives you these options and plenty more, including sound and display management, a build.prop editor and Tasker integration.  

    #15 Servicely
    Servicely is a newer application that helps control background services. This will allow you to do something like prevent Facebook from running in the background while your device screen is off. It’s a stop-gap for stopping rogue apps and unwarranted wake ups of your device and should help improve battery depending on how you use your device and which services you decide to stop. It’s a solid service and worth a shot if you have a service you just can’t stop.

    So,these were the top apps for a rooted phone which a user must have  to utilise their deviice properly.. :)


    Hey guys today im gonna provide you with the rooting methods for the coolpad note 3.Basically various methods didnt worked on it.I'll provide you with the two best methods which work.So,there are two ways to root your Coolpad Note 3,using computer or just using your device.
    Here you can know Why to root your device :
    Benefits of Rooting your Device


    First method to root is using the Kingo Root App which provides you with the root access instantly.This is the easiest method.So here we go ;)

    Just download the Kingo root app from this link - Kingo root
    Open it after installing
    When app opens just tap on One click Root and it will start processing.

    It will take some time,depending on your Internet Connection.
    And Boom you have rooted your Coolpad Note 3 without any problems and it works like charm.

    This is the easiest method to root your device.


    Now lets come upto a much better and computer requiring method.

    Rooting Coolpad Note 3 using Computer:


    1. Following Drivers are needed:


    2.Computer with Windows 7(Preferred)
    3.Download the following files :


    Disclaimer
    #Download these files only.Dont use other Sources 


    4.Install the Drivers and reboot your System.

    5.Unzip the SP flashtool file.

    6.Copy SuperSu 2.49.zip into internal memory of your device.

    7.Open SPflashtool folder and paste the Recovery file and the scatter file in it.

    8.Now open flashtool as administator and Click on Scatter Loading and select "MT6753_Android_scatter.txt"

    9.Click on "download"(on left top side with green colour icon in SPflash tool).

    10.Now switch off phone and connect to Pc via USB cable.Press twice the volume up button. A slider will run on bottom of SPflashtool. If everything fine then you will see a pop up with green tick. 

    11. Disconnect phone from PC. Press Volume up and Power button till recovery comes on the screen(This is important step,don't boot into normal mode,after flashing recovery you have to directly go to recovery mode by pressing Volume up + Power button simultaneously). 


    12. Now Recovery will open.

    13.Select Install and Select SuperSU_v2.49.zip.

    14.Flash the zip file and Reboot your device.Cheers your phone is Rooted now...

    Then for your Satisfaction you can Install Root Checker basic and Check your root status.


    After launching the Note 3 phablet in October last year, Coolpad has now launched a slightly affordable version called Coolpad Note 3 Lite. The Note 3′s major USP was bringing a fingerprint sensor under Rs 10,000 and now the Coolpad Note 3 Lite sets a new benchmark with a fingerprint sensor at Rs 6,999.Here I present you with the Stock rom for coolpad note 3 lite which will help you in restoring your device if anything happens to your installed rom.
    The fingerprint scanner can unlock the smartphone in 0.5 seconds with 99 percent accuracy, the company claims. Users can also lock and unlock apps using the fingerprint scanner. The smartphone also boasts a ‘self-cooling’ technique with nano-sealing to avoid overheating. Coolpad has announced that Videocon will be its manufacturing partner and the Note 3 Lite will be the company’s first Made in India smartphone.
    Coolpad Note 3 Lite specifications and features: It is equipped with a 5-inch HD display (720p) with pixel density of 268ppi. It is powered by MediaTek’s MT6735 64-bit quad-core processor clocked at 1.3GHz and paired with 3GB of RAM. It comes with 16GB of internal storage, and a microSD card slot for further expansion.
    The phablet also sports a 13-megapixel f/2.0 rear camera with LED flash and a 5-megapixel selfie snapper. It also features a 2,500mAh battery while connectivity options include dual-SIM card slots, 4G LTE, Wi-Fi, USB OTG and Bluetooth. The smartphone runs on Android 5.1 Lollipop with CoolUI 6.0 running atop, and will be updated to Android 6.0 Marshmallow in the future.

    In comparison, the Coolpad Note 3 is equipped with a MediaTek MT6753 64-bit octa-core processor, a slightly larger 5.5-inch HD display and packs a 3,000mAh battery, while rest of the specifications remains the same.
    So, Here I Present you with the stock rom of coolpad note 3 lite.
    Click Here to Download The Stock Rom.

    Many a times when we want to tweak our devices and root them,many mistakes occur from our side and which leads to Bricking of our devices.So,Today i am going to help you to rescue yourself from these situations.Today i will tell about Flashing Stock Rom on Coolpad Devices specially the Coolpad Note 3 and its lite variant.So,Basically i will illustrate about Flashing your Stock rom on your Coolpad Device.There would be many reasons for flashing Stock Rom like Bricking of your Device,Not good perfomance of updates and many other problems occur which lead us to installing the stock rom.
    Basic prequisties for Installing the Stock rom on coolpad devices are :
    Disclaimer: Please do it at your own risk, I am no way responsible if anything goes wrong or you ruin /brick your phone..


    1. Following Drivers are needed:


    #Install these components

    2.Your Device's Stock Rom is Needed.
    >> Coolpad Note 3 Lite Stock Rom

    Procedure for flashing the Stock Rom:

    1.Open S.P Flashtool.


    2.Click on Scatter file Option.

    3.Select the Scatter file from Downloaded Stock Rom.

    4.Click on download -> switch off your phone and connect to PC

    5.Wait till the green popup as below shows.


    6.Now disconnect your phone & reboot.It will stuck on Fastmmi mode written "up down" on screen.

    8.Download minimal ADBtool  and install it.

    9.Connect your device to the computer.    

    10.Open the adb tool just installed and check device is listed or not by " adb devices " command.

    11.If listed Give this command “adb shell fctest system reboot”

    12. Now your phone will reboot into Stock Rom.Congo.


    Hello friends,to fulfill the urge of hacking in you today im gonna write about hacking windows 8/8.1/10 login password.Basically this is a universal method for hacking login password of any windows os ranging from Windows XP to the Latest Windows 10.
    This method basically works on the principle of changing the name of a system file and then getting administrator access through it.


    so,basically for this method to work we need a bootable medium (either USB/CD) of a linux
    you can use any type of linux ranging from ubuntu to kali.I would suggest you to use Damn small Linux .This linux is of pretty small size(50MB).


    Damn small Linux


    If you dont know about making bootable pendrive you can check out this post :
    So let us move onto the main steps:

    1. Bootup the linux USB.(which we created in the above step)

    2.Locate the Drive where windows is installed (mostly in C:/ ;) )

    3.Go to Windows/system32

    4. Find cmd.exe rename it to cmd1.exe

    5. Find sethc.exe and rename it to cmd.exe

    In the 4th and 5th step we have done the most important step of hacking into the windows 10/8/8.1 password. what we have done is that we have replaced the sticky key(shift 5-times) executable to cmd.exe which is gonna open in administrator mode.

    6. Now shutdown Linux and bootup into Windows.

    7. Now in the login screen press the shift button 5/6 times.

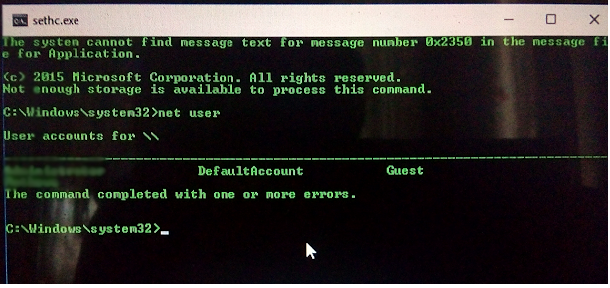
    8. The cmd window would open in Administrator privilege.Just type

       net user


    9.You would see the list of users.Note the user you want to hack.

    10. Type in the following command
                   
                   net user admin * 


    11. It will ask you for new password.Enter the       password and there you hacked into admin of a Windows system.

    That was..simple.. if you dont wanna use linux you can use my another method of hacking windows password.

    If you have any doubts leave them in comments.